


It is crucial to avoid issues like the one I encountered after joining a Node.js project. The project had strange code that simultaneously started multiple CPU and memory-demanding processes whenever we deployed a new application version. This approach caused high resource consumption and crushed crucial processes due to insufficient resources. Vertical scaling temporarily solved the problem, but it wasn't enough.
To avoid such issues, we implemented strategies to manage the processes and change our scaling approach, including correctly managing each process's resources to prevent excessive resource consumption.
In this article, you'll learn about tools you can use to properly manage resources like memory, CPU, and others in a Node.js application.
Overview
We have several options to manage resource consumption in Node.js applications, including:
Limiting V8 memory heap size: By setting a specific limit on heap size, we can make the garbage collection mechanism more efficient and avoid running out of memory.
Using PM2: PM2 can restart a process whenever it reaches some memory usage cap.
OS-specific features: Each OS provides a set of specific features and utilities that limit resource usage.
Container: You can use containers to limit resource usage of applications inside the container.
Now, let’s look at each of those options in more detail.
Managing V8 memory heap size via CLI options
We can manipulate the memory heap size of the V8 JavaScript engine that Node.js uses by default. Two available options are --max-old-space-size and --max-semi-space-size.
These two options are directly related to the garbage collection process.
V8 uses a generational garbage collection strategy. The initial heap consists of two parts: young and old generations.
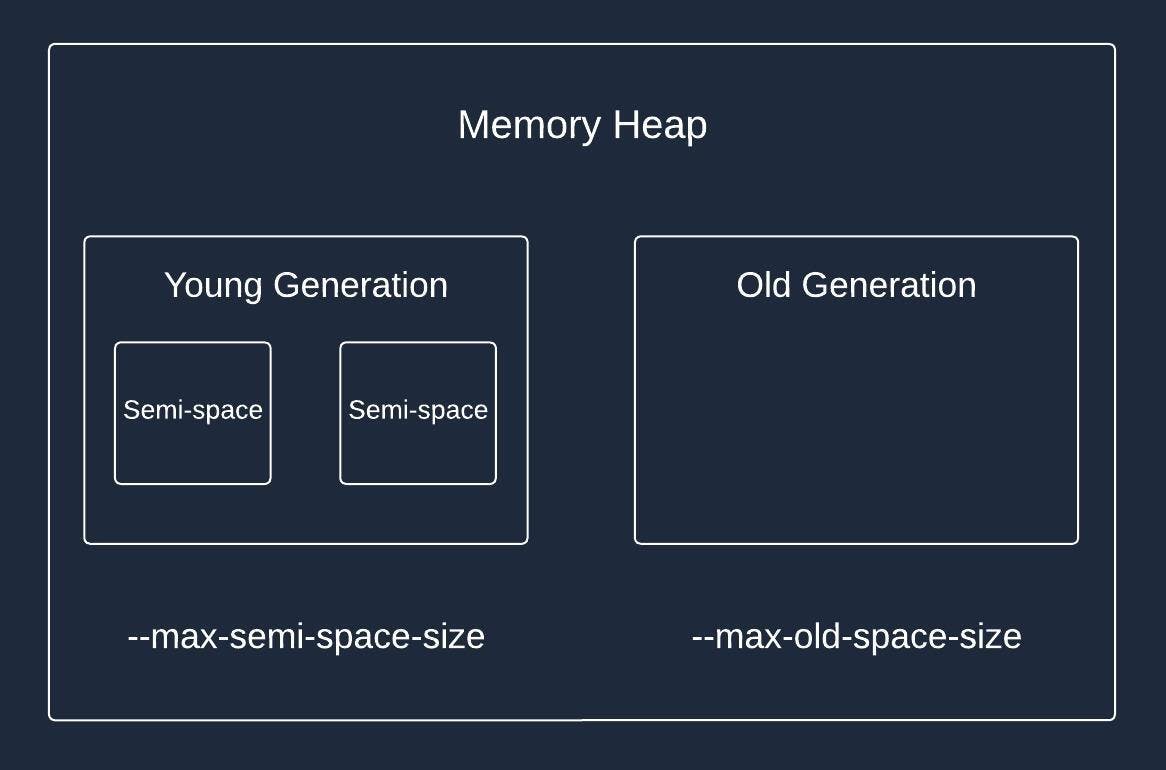
As you can see, the young generation consists of two parts called semi-spaces. The --max-semi-space-size option allows us to configure the size of these semi-spaces.
All newly created objects first get into the young generation heap. If an object survives a certain number of garbage collections, it is promoted to the old generation. The objects in semi-space are short-lived and get either promoted or destroyed relatively fast.
On the other hand, you might have many objects that live for a long time and aren't destroyed by a garbage collector. That’s where the --max-old-space-size option comes in handy. When the old size generation gets closer to its limit, the garbage collection process runs more frequently to clear up the space.
Here is an example command where we limit the size of the old space generation to 2GB.
node -–max-old-space-size=2048 app.js
The size is set in megabytes.
Memory limits with PM2
PM2 is a popular Node.js process manager. It provides the ability to restart a particular process based on the memory consumed by a process.
The process manager has a specific configuration option called max_memory_restart.
The max_memory_restart tells PM2 to restart the process whenever it reaches the memory usage limit. Here is an example of using it directly within CLI:
pm2 start api.js max_memory_restart 500M
In this example, we tell PM2 to restart a process whenever memory consumption reaches 500M.
Memory is the only resource that we can manage through PM2.
OS-specific options
This section covers features of Linux or any other Unix-based OS to run Node.js. However, Windows has similar mechanisms. You can find Windows alternatives in each section without any further details.
User limit
Windows alternative - Windows System Resource Manager (WSRM).
User limit is a system command that allows setting limits on the number of resources used per user. It has two types of limits: soft and hard.
Soft limits are the ones that current users might manage and increase or decrease as needed. The hard limit tells up to which numbers the soft limit can be raised. It is configured exclusively on the root level and is needed to add an extra layer of protection.

As an example, you can set a CPU time limit with the following commands:
# Set hard limit of CPU usage to 50 seconds per process
ulimit -H -t 50

# Set soft limit of CPU usage to 25 seconds per process
ulimit -S -t 25
Control group
Windows alternative - Job Object
The control group (cgroup) is an alternative feature for managing resource usage. It serves a similar purpose to user limits (resource control), but the approach is different.
The control group is an abstraction that allows users to group different processes and allocate a specific number of resources, such as CPU, memory, or file I/O, to each group. The control group ensures that processes under this group will only use the allocated resources.

Here is an example of how to create a control group and add a process to it:
# Create a new cgroup
sudo cgcreate -g memory:/my_node_group

# Set a memory limit to the group
sudo echo 536870912 > /sys/fs/cgroup/memory/my_node_group/memory.limit_in_bytes

# Add process to the cgroup
sudo echo <PID> > /sys/fs/cgroup/memory/my_node_group/tasks
Despite the number of processes you add to this group, they will be collectively limited to 512MB of memory.
Isolate and Control Resource Using Containers
Containers are similar to control groups; in fact, containers use control groups to isolate resources and set strict limits to them. However, they go beyond just resource management and provide a spectrum of additional features like:
Network isolation
Filesystem isolation
Isolation of hostname and domain name
User and user group isolation
And others
As you can see, containers offer much more than resource management. They are much closer to a virtual machine (VM).
At the same time, tooling around containers is superior, thanks to projects like Docker and Podman. You can seamlessly create new containers and set their parameter, including resource limits.
This tooling makes it easier to use and manage containers than to do so manually with control groups. That’s why you usually see containers instead of plain control groups in real-world projects.
The control groups catch
There is a catch when using control groups directly or by any other containerization solution that uses control groups.
Currently, there is no way to know the exact constraints from within the Node itself, at least in a straightforward way. For example, if we set a limit of 1 CPU per container but have 5 in total on the machine, Node only knows about those 5, not the one it is running in.
In theory, this behavior is already fixed in Node.js 20.x. However, people are still running into the issue, which means it is still present.
If you ever need to make the Node application aware of particular resource constraints, the most straightforward approach is to declare those inside the Node application itself. This duplicates the sources of truth, but we can clearly respect the configuration without any additional overhead.
Conclusion
Whether you're preventing crashes, ensuring smooth multi-application environments, or optimizing performance, you now have the tools to manage Node.js resources effectively.
They range from Node CLI-specific, like passing options to limit heap sizes and using PM2 process manager, to more ubiquitous, like user limits, control groups, and containers.
In the next article, we'll examine the pros and cons of each approach and determine which is probably the best.